Level Up: Easy Mario Costume DIY Ideas + Guide [Year]
Ever dreamt of leaping into the Mushroom Kingdom? Is it possible to transform into the iconic hero without breaking the bank? Absolutely. The magic lies in Mario Costume DIY, a realm where creativity meets craftsmanship to bring the beloved video game icon to life.
Mario Costume DIY is more than just putting together an outfit; it's a journey of imagination and resourcefulness. It involves meticulously crafting a Mario costume from the ground up, utilizing diverse materials and techniques tailored to your skill level and desired aesthetic. Whether you're aiming for a simple, recognizable look or a highly detailed, competition-worthy ensemble, the possibilities are endless. Some costumers opt for readily available patterns and pre-cut materials, while others embrace the challenge of designing and creating their own patterns from scratch. The beauty of DIY lies in its adaptability from choosing the perfect shade of red for Mario's cap to hand-stitching every detail on his overalls, the process is a deeply personal one. It's about having fun, experimenting, and ultimately, embodying the spirit of Mario in a way that's uniquely your own.
| Category | Information |
|---|---|
| Character | Mario |
| Occupation | Plumber, Hero |
| Signature Outfit | Red cap, Blue overalls, Red shirt |
| Materials for DIY | Fabric, Felt, Foam, Thread, Needles, Glue, Paint |
| Skills Involved | Sewing, Gluing, Shaping, Design |
| Purpose of Costume | Halloween, Cosplay, Parties, Personal Enjoyment |
| Link | Nintendo Official Website |
For those new to the world of Mario Costume DIY, a few guiding principles can significantly ease the process. The first, and perhaps most crucial, is to realistically assess your skill level. A beginner shouldn't immediately aim for an intricately designed costume with complex patterns and advanced sewing techniques. Instead, start with a simplified design that focuses on the essential elements: the overalls, the cap, and the shirt. Secondly, before you even begin to cut fabric or thread a needle, gather all the necessary materials. This preemptive step can save you valuable time and prevent frustration later on. Having everything at your disposal means you can smoothly transition from one step to the next without unexpected trips to the craft store.
- Guide Vegamovies 4k Download Free Movies Is It Safe
- Guide To Vegamovies Download 300mb Is It The Right Choice
With a design in mind and your materials assembled, the real work begins. The foundational step involves creating the body of the costume. This can be achieved through various methods. Sewing fabric pieces together to form the basic shapes is a traditional and durable approach. Alternatively, felt or foam can be used to create the desired shapes, offering a quicker and potentially less complex alternative. Once the body of the costume takes form, the real magic happens: adding the details. This is where the overalls gain their iconic bib and straps, the cap receives its signature "M," and the mustache is carefully attached to complete the look.
Ultimately, Mario Costume DIY is an exercise in creativity and a celebration of a beloved character. With thoughtful planning and dedicated effort, anyone can construct a unique and personalized costume that's guaranteed to turn heads. Whether you're aiming for an accurate replica or a whimsical interpretation, the process is about expressing your passion and having fun while doing so.
Mario Costume DIY
The process of creating a Mario costume through DIY methods is multifaceted, encompassing several key elements that contribute to the final product's authenticity and overall impact. These elements work in concert, each influencing the others to determine the success of the costume.
- Discovering The Tonga Kid Culture Rugby Resilience
- All About Evangeline Lilly Husband Norman Kalis Life Amp Career
- Design: This involves translating the iconic image of Mario into a workable plan. It's not merely about copying; it's about understanding the shapes, proportions, and key features that make Mario instantly recognizable. The overalls, the cap, the shirt each element must be faithfully represented.
- Materials: Selecting the right materials is crucial. The choice of fabrics, felt, and foam will determine the texture, durability, and overall aesthetic of the costume. Will the overalls be made of sturdy denim, or a lighter, more comfortable cotton blend? Will the cap be firm and structured, or soft and pliable?
- Construction: This is where the design and materials come together. Sewing, gluing, shaping these are the techniques used to assemble the various components of the costume. Precision and attention to detail are paramount.
- Details: These are the finishing touches that elevate the costume from a simple imitation to a convincing portrayal. Buttons, patches, and the iconic mustache these details add depth, texture, and authenticity.
- Customization: While staying true to the core design is important, customization allows for personal expression. Adding unique embellishments, incorporating elements from other characters, or simply choosing a different color scheme can make the costume stand out.
- Comfort: A costume is only as good as its wearability. Ensuring comfort is essential, particularly for costumes that will be worn for extended periods. Breathable fabrics, a good fit, and ease of movement are all crucial considerations.
- Presentation: The final element is how the costume is presented. Styling the costume with accessories like gloves and shoes, and even adopting Mario's signature poses and mannerisms, can complete the illusion.
These aspects are deeply interconnected. The design influences the choice of materials, the construction techniques affect the overall comfort, and the details enhance the presentation. A successful Mario Costume DIY project requires a holistic approach, carefully considering and executing each element to create a costume that is both visually appealing and personally satisfying.
The design is the bedrock of any successful Mario costume. It's the blueprint that guides the entire process, ensuring that the finished product accurately reflects the character's instantly recognizable appearance. The design process involves carefully recreating the overalls, cap, and other signature elements that are synonymous with Mario.
- Color accuracy: The vibrant red and blue colors of Mario's outfit are essential for achieving an authentic look. Meticulous attention to color matching is paramount. Sourcing fabrics and materials that precisely match Mario's official color palette will instantly elevate the costume's realism.
- Overalls: The overalls are arguably the defining feature of Mario's costume. They should be constructed from a durable fabric that can withstand wear and tear. The characteristic bib and shoulder straps must be accurately replicated, ensuring both visual accuracy and a comfortable fit. Consider adding functional pockets for practicality.
- Cap: Mario's cap is equally iconic. The distinctive "M" logo is instantly recognizable and should be carefully replicated. The cap itself should be crafted from a sturdy material that can maintain its shape, whether it's buckram, heavy felt, or a similar stiffener. The "M" logo can be embroidered, appliqued, or even created using a 3D printing technique for a professional finish.
- Accessories: The accessories complete the overall look and add a layer of depth to the costume. White gloves are a classic addition, as are brown or sturdy shoes. Consider adding a faux mustache, crafted from felt or theatrical hair, to further enhance the resemblance.
By meticulously considering these design elements, individuals can create a Mario costume that not only captures the character's iconic appearance but also allows them to fully embody the beloved video game character. The design is the foundation upon which a successful costume is built.
The materials chosen for a Mario Costume DIY project are paramount, influencing not only the visual aesthetic but also the costume's durability and comfort. The selection of fabrics, felt, and foam should be carefully considered to achieve the desired outcome.
- Fabric: The choice of fabric is critical. For the overalls, durable fabrics such as denim, twill, or canvas are highly recommended. These materials offer both the necessary structure and the ability to withstand wear and tear. For the shirt and cap, lighter fabrics like cotton, jersey, or a breathable synthetic blend are ideal. These will provide comfort and prevent overheating, especially when wearing the costume for extended periods.
- Felt: Felt is an invaluable material for crafting details and accessories. It's particularly well-suited for creating the mustache, eyebrows, and buttons due to its ease of use and ability to hold its shape. A variety of colors and thicknesses are available, allowing for precise replication of the character's features.
- Foam: Foam is an excellent choice for adding volume and shape to certain elements of the costume. It's commonly used to create a rounded belly or to provide structure to the hat brim. Different densities of foam can be used to achieve varying degrees of firmness and support.
- Other materials: In addition to the primary materials, a variety of other items may be required. Thread, needles, glue (fabric glue and hot glue), paint (fabric paint or acrylics), and fasteners (buttons, zippers, snaps) are all essential for completing the costume. Investing in high-quality materials will ensure the costume's longevity and prevent premature wear.
Careful consideration of the materials used in the construction of the costume will result in a Mario Costume DIY project that not only looks authentic but also stands the test of time, remaining a cherished and wearable creation for years to come.
The construction phase of a Mario costume DIY is where the design and materials coalesce, transforming into a tangible representation of the beloved character. This stage involves a careful combination of sewing, gluing, and shaping techniques, each playing a critical role in ensuring the costume's durability, accuracy, and overall aesthetic appeal.
- Fabric Manipulation:
Sewing is the primary technique used to join fabric pieces together, forming the overalls, shirt, and cap. Mastering basic sewing skills is essential for this stage. Paying close attention to seam allowances ensures a clean and professional finish. Reinforcing seams with a double stitch or serging can significantly enhance the costume's durability.
- Adhesive Applications:
Gluing is employed to attach smaller details, such as the mustache, eyebrows, and buttons. Selecting the appropriate adhesive for the specific materials being used is crucial. Fabric glue is ideal for adhering fabric to fabric, while hot glue can be used for attaching heavier or more rigid elements. Ensure proper ventilation when using adhesives.
- Shaping and Embellishments:
Shaping techniques, such as stuffing and molding, are utilized to create volume and form, particularly in areas like the belly and hat brim. Embellishments, such as patches or embroidery, add intricate details and enhance the costume's visual appeal. Consider using fusible interfacing to stabilize fabric before adding embellishments.
- Finishing Touches:
Once the main components are assembled, finishing touches are essential to refine the costume's appearance. Hemming raw edges prevents fraying, pressing or ironing smooths out wrinkles, and adding closures (buttons, zippers, snaps) ensures a secure and comfortable fit.
By skillfully employing these construction techniques, individuals can create a Mario costume DIY that is not only visually accurate but also showcases their craftsmanship and attention to detail, resulting in a garment that is both wearable and a testament to their creative abilities.
The details are the soul of a Mario Costume DIY. They are the seemingly small additions that ultimately determine the costume's authenticity and its ability to truly capture the character's iconic essence. These finishing touches, from the strategically placed buttons to the meticulously crafted mustache, are what breathe life into the project.
The buttons that adorn Mario's overalls, typically bright red or vibrant yellow, are more than just fasteners; they are visual punctuation marks. Their color, size, and placement contribute to the overall aesthetic appeal, drawing the eye and adding a touch of playful charm. Similarly, patches, often emblazoned with the iconic "M" logo or other symbols associated with the Mario universe, inject a sense of depth and dimension into the costume. These patches serve as visual reminders of Mario's identity and his world.
Of course, no Mario costume would be complete without the mustache. This defining characteristic is instantly recognizable and is crucial for conveying the character's personality. Creating a realistic mustache requires careful attention to detail. The material, whether it's felt, theatrical hair, or even carefully sculpted foam, must be chosen with consideration. The shape, size, and placement of the mustache must be precise to accurately replicate Mario's iconic look.
Adding these finishing touches is not merely about adhering to a pre-determined checklist. It's about demonstrating a commitment to excellence and showcasing the dedication and skill of the costume creator. By meticulously incorporating these details, individuals elevate their Mario Costume DIY projects from simple imitations to truly authentic representations of the beloved video game character.
In the dynamic world of Mario Costume DIY, customization stands as a powerful tool, enabling individuals to transcend mere replication and infuse their creations with personal expression and unique flair. This involves thoughtfully incorporating personalized touches or distinctive elements that set the costume apart from generic renditions, allowing the wearer to express their individual style and artistic vision.
Customization can manifest in myriad forms, spanning from subtle alterations to bold reimagining. Some opt to add unique design twists by integrating elements borrowed from other characters or thematic sources, fashioning intriguing fusion costumes that seamlessly blend Mario's classic aesthetic with other revered pop culture icons. Others choose to personalize their costumes with intricate details, such as custom-designed patches boasting original artwork or meticulously embroidered embellishments that showcase their refined craftsmanship and artistic sensibilities.
The profound significance of customization lies in its remarkable ability to metamorphose a commonplace Mario costume into a truly exceptional and unforgettable creation. By weaving in personal touches, individuals can fashion costumes that are not only visually striking but also deeply reflective of their own unique personality and artistic interests. This elevated level of customization empowers cosplayers to assert their individuality while simultaneously celebrating their abiding affection for the cherished video game character.
When it comes to Mario Costume DIY, comfort isn't a luxury; it's a necessity. It's the invisible thread that weaves together a fantastic costume with an enjoyable experience. A costume that prioritizes comfort allows the wearer to fully embody the character, moving freely and confidently without the distraction of chafing, overheating, or restricted movement.
The practical implications of comfort are undeniable. A costume that's itchy, too tight, or doesn't allow for proper ventilation can quickly become a source of misery. It can detract from the wearer's ability to fully participate in the event, whether it's trick-or-treating, attending a convention, or performing on stage. By carefully considering the materials used, the construction techniques employed, and the overall design, individuals can create costumes that are both visually stunning and exceptionally comfortable to wear.
Furthermore, prioritizing comfort aligns with the very essence of Mario himself. He's an agile, energetic character who's always on the move. A comfortable costume allows the wearer to emulate Mario's physicality, capturing his spirit of adventure and his boundless enthusiasm. It's about more than just looking the part; it's about feeling the part.
In the grand tapestry of Mario Costume DIY, presentation is the final, crucial thread that ties everything together. It's the art of transforming a well-crafted costume into a truly captivating and immersive experience. Accessories, such as the iconic gloves and the sturdy shoes, are not mere afterthoughts; they are essential components that complete the overall look and fully realize the character of Mario.
The gloves, often pristine white or a bold shade of red, contribute an additional stratum of detail and authenticity to the ensemble. They effectively conceal the wearer's skin, further blurring the boundary between reality and the fantastical realm of the video game, enhancing the illusion that the wearer has truly stepped into Mario's shoes. The shoes, typically rendered in a practical brown or a classic black, provide a solid and dependable foundation, completing the quintessential Mario silhouette. These footwear choices afford the wearer the liberty to navigate any environment with unwavering confidence, wholeheartedly embodying Mario's energetic and adventurous disposition.
The profound significance of presentation cannot be overstated. Accessories, such as the aforementioned gloves and shoes, serve to amplify the costume's overall visual allure, rendering it instantly recognizable and exquisitely faithful to the character's established design. By lavishing meticulous attention upon these seemingly minute details, individuals palpably demonstrate their unwavering dedication to crafting a Mario Costume DIY that is not only of the highest caliber but also possesses an unparalleled level of authenticity.
This section provides answers to frequently asked questions regarding Mario Costume DIY, offering insights and guidance for those undertaking their own projects.
Question 1: What materials are best suited for creating a Mario costume?The optimal material choices for a Mario costume depend on the specific component being created. For the overalls, consider durable fabrics such as denim or canvas, which offer both structure and resilience. For the shirt and cap, lighter materials like cotton or jersey provide comfort and breathability. Felt is ideal for crafting details like the mustache, eyebrows, and buttons, while foam can add volume to areas like the belly and hat brim.
Question 2: How can I ensure that my Mario costume is both comfortable and durable?To strike the perfect balance between comfort and durability, prioritize the selection of breathable fabrics that allow for ease of movement. Incorporate elastic or adjustable elements into the design to ensure a snug yet comfortable fit. To enhance durability, opt for sturdy materials and reinforce areas that are prone to wear and tear, such as the seams and joints. Additionally, consider lining the costume with a soft, breathable fabric to minimize irritation.
By carefully addressing these aspects, individuals can create a Mario Costume DIY that not only captures the character's iconic look but also provides a comfortable and long-lasting wearing experience.
- Untangling The Story Kevin Samuels Wives And Relationships Explored
- Unlock 7starhd Your Guide To Movies Tv Streaming Year
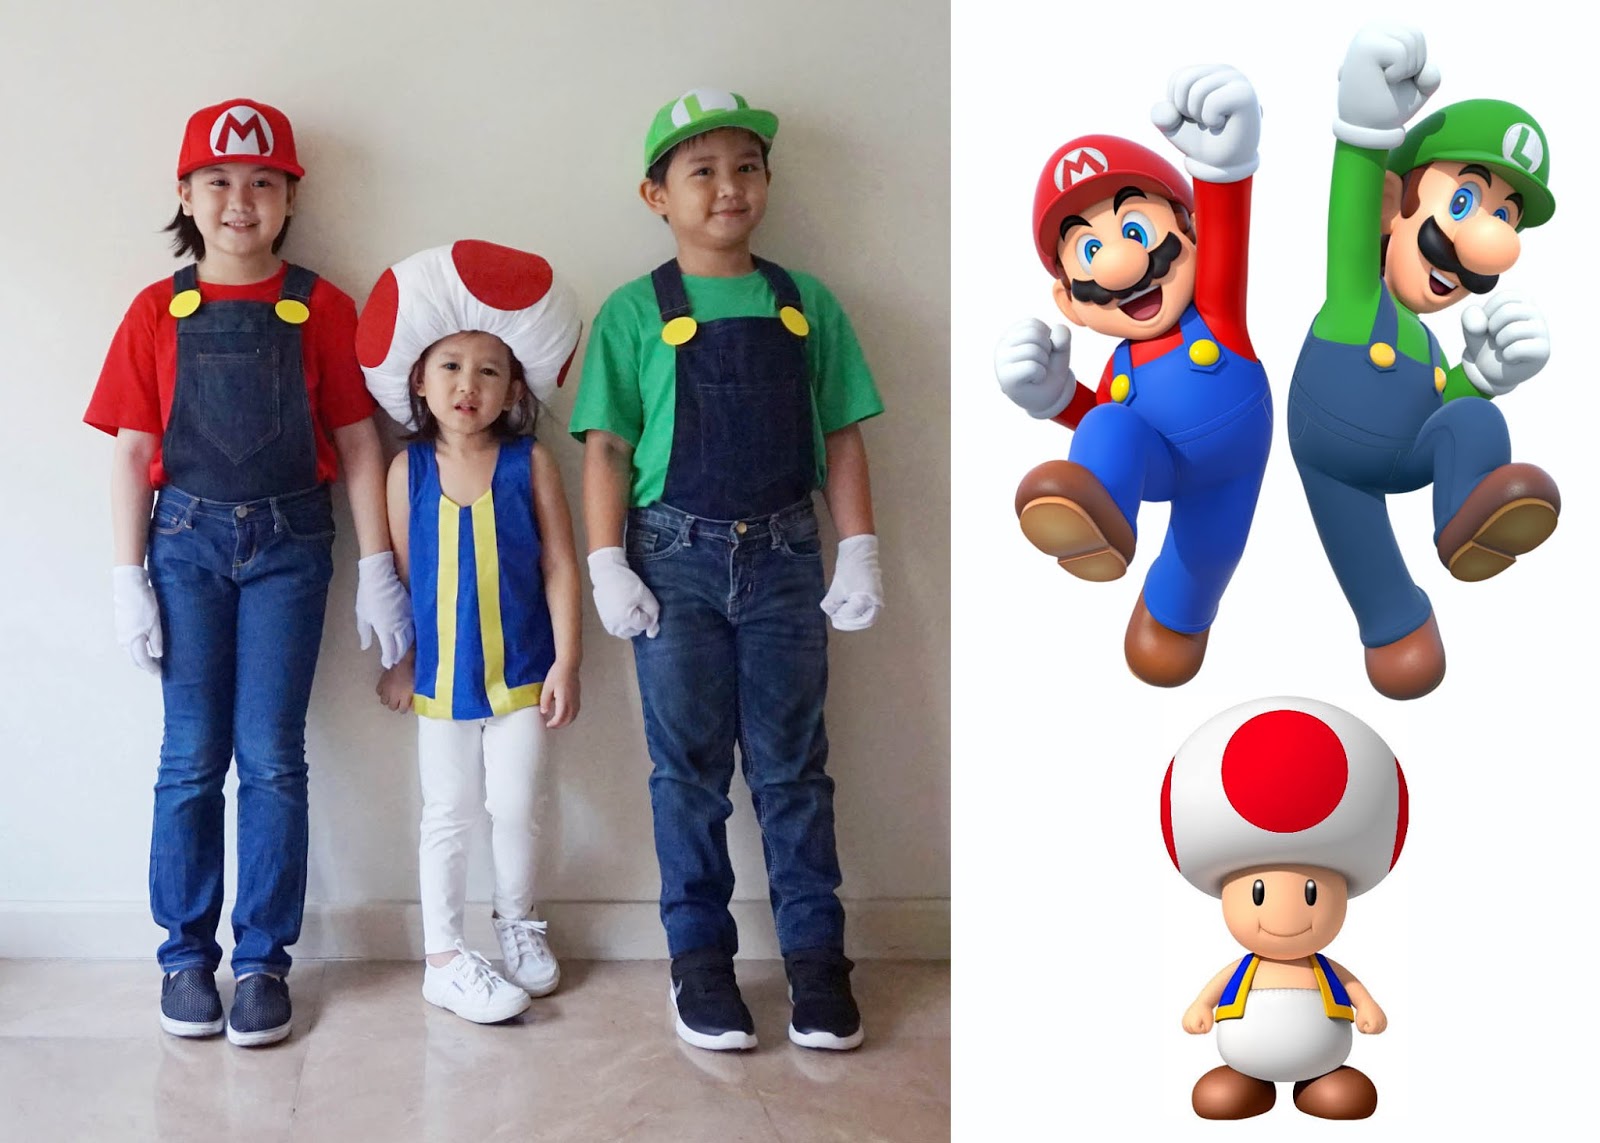
MrsMommyHolic DIY Mario Bros. and Toad Costume

How I created the ultimate Super Mario Bros. Halloween costumes for my

Family Halloween Costume and Themes // Easy DIY Tutorials and Ideas
